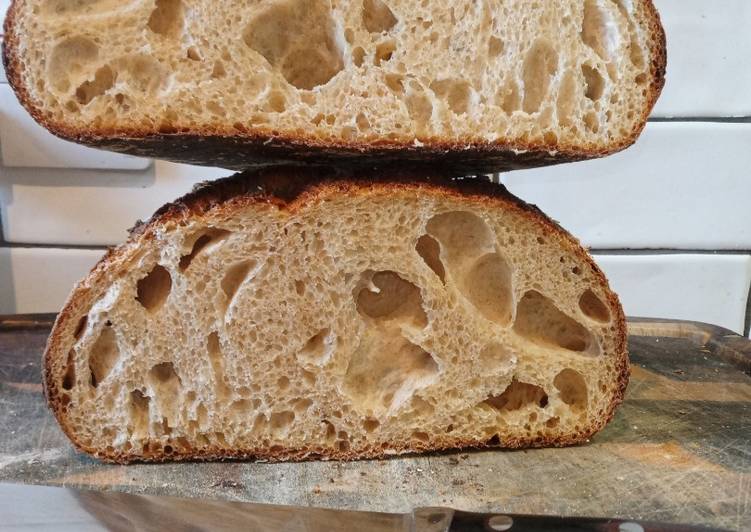
Hello everybody, it is Louise, welcome to our recipe site. Today, we’re going to prepare a distinctive dish, sourdough bread recipe for teaching my 7yo niece. It is one of my favorites food recipes. This time, I’m gonna make it a little bit unique. This will be really delicious.
Dissolve the fresh brewer's yeast with half of the lukewarm water. I made it for my children all the time. My mom and gma also made fried corn bread like the fried bread and we all loved it. My kids even loved eating the fried bread with sausage gravy on it instead of the homemade bisquits for breakfast.
Sourdough bread recipe for teaching my 7yo niece is one of the most favored of current trending foods in the world. It’s easy, it’s fast, it tastes yummy. It is appreciated by millions every day. They’re nice and they look wonderful. Sourdough bread recipe for teaching my 7yo niece is something that I’ve loved my whole life.
To get started with this particular recipe, we must first prepare a few components. You can cook sourdough bread recipe for teaching my 7yo niece using 23 ingredients and 23 steps. Here is how you can achieve it.
The ingredients needed to make Sourdough bread recipe for teaching my 7yo niece:
- Get The Levain
- Make ready 60 g Sourdough starter (well fed & bubbly)
- Take 60 g Bread flour
- Take 60 g Luke warm tap water
- Take The Bread
- Get 90 g Levain
- Get 500 g White bread flour
- Make ready 5 g Sea salt
- Take 300 ml Luke warm tap water
- Get For shaping & basket - 1 of - Rice, Spelt or Semolina flour plus a little bit more bread flour. just a little bit of both
- Get Equipment needed
- Take 1 Bread basket for shaping (Banneton preferable)
- Take 1 digital scale
- Take 1 Spatula
- Take 1 Timer
- Prepare 1 Bread Scraper
- Take 1 Small/medium see through bowl for Levain
- Prepare 1 small/medium see through pot or bowl for feeding starter
- Make ready 1 Larger bowl for bread proving
- Make ready Cling film & Baking paper
- Prepare Razor blade or sharp knife (adults only to use)
- Make ready 1 Baking tray - flat no or low sides
- Take 1 Baking tray - higher sides to hold water
Pastry using spelt and Kamut and barley and rye. These recipes, none overly sweet, fit easily into what I was reading about Fika. Hello,I have been encouraging my niece to cook home cooked meals a lot over the last year or so. I bought her a complete kitchen make over set for her studio including Staub, Demerye and Mauviel cookware among others.
Instructions to make Sourdough bread recipe for teaching my 7yo niece:
- Day 1 - Morning, take your sourdough starter out of fridge and leave for an hour to come to room temperature. Today we are just going to feed the starter so it is lively and bubbly, then make the LEVAIN before making the bread tomorrow.
- After 1hr feed it by putting it in a small/medium see through pot or bowl and adding 50g of bread or plain flour & 50g of luke warm water, stir it well with a spatula to mix fully, cover with cling film and poke some air holes in the top, leave for 4-5 hours in a warm place. Clean the pot your starter came out of and leave to dry.
- Once doubled or more (4-5 hours) it should be a bit more bubbly - Carefully remove the cling film so you can reuse. Feed again with the same amount (50g flour/50g water), cover with the cling film and leave again for 4-5 hours again.
- Once doubled again and more bubbly pour 60g of your starter into your glass bowl (use the digital scales), to the 60g of starter add 60g of bread flour and 60g of luke warm water and mix fully with a spatula so sides are clean. Cover with cling film, add air holes and leave overnight - this is called a LEVAIN and will grow bubbly and spongy overnight to help your bread rise.
- With your leftover sourdough starter - pour 50g back into your clean and dry pot, put lid on and put back in the fridge until you need again or it needs feeding (see Sourdough Starter recipe)
- Day 2 - Making the bread - in your larger bowl put in your 500g bread flour and 300g of luke warm water after measuring them. with clean fingers get in and mix all the flour into the water, try to use fingers only. put lid on and leave for 45 mins. The water makes the gluten in the flour stronger so it behaves better when you are shaping it and give you a better and tastier loaf of bead when it is cooked. this is called AUTOLYSE.
- Whilst you are waiting for the AUTOLYSE to finish. Weigh out 5g of salt in a little dish and weigh 90g of your LEVAIN into another.
- When the 45 mins is up, feel the flour and see how different it is. now add the salt over the top of it, then add the LEVAIN onto the top if it and spread out with your hands. Now you need to pinch and scrunch with both of your hands to get all of it mixed together. it will be tough to start and then get easier and be very wet, just keep going for 5 mins until all combined. Cover and leave for 30mins. This is the start of BULK FERMENTATION where we will build strength, volume and flavour. 4hrs.
- After 30 mins we are going to start building strength in the bread by stretching and folding it. get a little cup of water and leave next to you to wet your hands. in the same bowl we will do 1 set of stretch and folds then cover and leave for 30 mins before doing again and leaving for 30 mins before doing a 3rd time and leaving for 2 hours.
- To stretch and fold - wet your hands a little, not a lot. Lift the dough furthest from you with both hands upwards and fold towards you to the bottom. Turn the bowl a quarter and do again, turn a quarter and do again, turn a quarter and do it one last time. that is one set. cover and leave for 30 mins. we will do this 3 times in total, if the dough is still loose we can do a 4th time. you will feel it get stronger and easier to handle each time. after the last time cover and leave for 2hrs
- That is the end of the BULK FERMENTATION. Now we are going to SHAPE the dough ready to bake.
- Tip dough out onto a clean, dry surface with a touch of flour with your hands. rub a little flour on your hands to prevent sticking. sprinkle some on top of the dough too. then with a fist, press down on the dough to flatten out and stretch each side out.
- Pull each corner of the dough to the middle and flip over. with a dough scraper we will then pull it towards us until tight. turn it a quarter and do again. keep doing until tight and the shape you want. we need to create TENSION so it is strong.
- Sprinkle well with your 'extra flour' on top, i use spelt.
- In your lined basket, put plenty of your extra flour and move all around to cover and prevent sticking. put some flour on your hands too. with the scraper tip the dough into your hands so that the smooth bit is under neath and lay down in the basket.
- If the dough on top needs pinching together we do that now.
- Sprinkle some more of your 'extra flour' on top, put a plastic bag or damp tea towel over the top and leave in warm place for 2 hours to get ready to bake. (if you want to you can put this in the fridge overnight after 30 mins to bake in the morning) this is called RETARDING which basically means the fermentation slows down - as if it was sleeping.
- After 2 hours turn on the oven to 250' and put the shelf in the middle.
- Get you low baking tray and put some baking paper on the bottom of it, put on top of the bread basket and tip over confidently so that it comes out of the basket onto the tray.
- Get your adult now to boil some water, put in high side baking tray half way up and put into the bottom of the oven, whilst they are with you ask them to get the razor/sharp knife and put 1 long score down one side of the top of the bread (5mm - at an angle) - this is called the EAR and it helps the bread spring upwards during cooking.
- Put bread into oven, turn straight down to 225', set timer to 30 mins, after 30 mins turn the bread around so that it colours evenly.
- Bread should be dark after 50 mins. if it isnt, give it another 5-10 mins. Remove and put on a cooling rack until completely cool (overnight the best) It is still working its magic inside so do not cut when hot or warm.
- Once cooled, Slice and Eat it. great toast.
Hello,I have been encouraging my niece to cook home cooked meals a lot over the last year or so. I bought her a complete kitchen make over set for her studio including Staub, Demerye and Mauviel cookware among others. She has been doing very well and I have been thoroughly enjoying her creations in the kitchen. Now, I would like to purchase a complete set of equipment for her Cooking with kids can be challenging and it takes a good amount of time in the kitchen — and a few messes along the way — to know what your kids are really capable of. That's why we turned to our Allstars, the super users of this site, who are avid home cooks, and have spent quite a bit of time in the kitchen.
So that’s going to wrap it up for this special food sourdough bread recipe for teaching my 7yo niece recipe. Thank you very much for reading. I am confident you can make this at home. There’s gonna be interesting food in home recipes coming up. Remember to bookmark this page in your browser, and share it to your loved ones, friends and colleague. Thanks again for reading. Go on get cooking!